
Blog
Step by step flooring transitions guide for a polished finish

Mar
Uneven or poorly installed flooring transitions can disrupt the flow of your home, creating unsightly gaps and potential trip hazards. Whether you’re connecting laminate to carpet, wood to tiles, or dealing with uneven floor heights, getting transitions right is essential for both aesthetics and safety. This guide provides practical, step by step instructions to help you install professional quality flooring transitions that enhance your home’s finish and durability.
Table of Contents
- Understanding Flooring Transitions And Preparation
- Selecting The Right Transition Strip For Your Floors
- Step By Step Installation Of Flooring Transitions
- Common Mistakes, Troubleshooting, And Finishing Touches
- Explore Quality Flooring Trims For Your Project
- Frequently Asked Questions About Flooring Transitions
Key takeaways
| Point | Details |
|---|---|
| Proper expansion gaps | Wood floors need 1/2" to 3/4" gaps at doorways to accommodate natural expansion and contraction. |
| Match transition to height difference | T-moulding suits floors within 1/4" height difference, whilst reducer strips create gradual slopes between different levels. |
| Acclimation prevents damage | Proper acclimation stops gapping and warping after installation, ensuring long term stability. |
| Right tools ensure quality | Using tapping blocks and pull bars protects locking systems and achieves tight, professional seams. |
| Safety improvements | Well installed transitions eliminate trip hazards and create smooth pathways between rooms. |
Understanding flooring transitions and preparation
Flooring transitions are specialised strips that connect different flooring types or bridge gaps where flooring meets doorways, walls, or other surfaces. They serve multiple purposes: accommodating natural wood movement, creating visual continuity, and preventing edges from lifting or catching.
Wood and laminate flooring expand and contract with temperature and humidity changes. Transitions accommodate this movement with a 1/2" to 3/4" gap at doorways or edges. Without proper spacing, floors can buckle, warp, or develop unsightly gaps. This fundamental principle applies whether you’re working with solid wood, engineered planks, or laminate.
Before installation, acclimate your flooring material in the room where it will be installed for at least 48 hours. Proper acclimation prevents gapping and warping after installation. This step is particularly crucial for wood and laminate products, which are more susceptible to moisture related movement.
Transitions commonly connect these material combinations:
- Wood to carpet in doorways
- Laminate to vinyl in open plan spaces
- Tiles to hardwood between wet and dry areas
- Different wood species or plank directions within rooms
Gather these essential tools and materials:
- Tape measure and pencil for precise measurements
- Hacksaw or mitre saw for cutting metal strips
- Drill with appropriate bits for pilot holes
- Spirit level to ensure even placement
- Adhesive or screws depending on fixing method
- Spacers to maintain consistent expansion gaps
Pro tip: Place a moisture barrier beneath transitions in areas prone to spills or humidity, such as kitchen and bathroom doorways. This extra layer protects subfloors and extends the life of your installation. For detailed guidance on installing flooring edge trims, consider starting with simpler projects to build confidence.
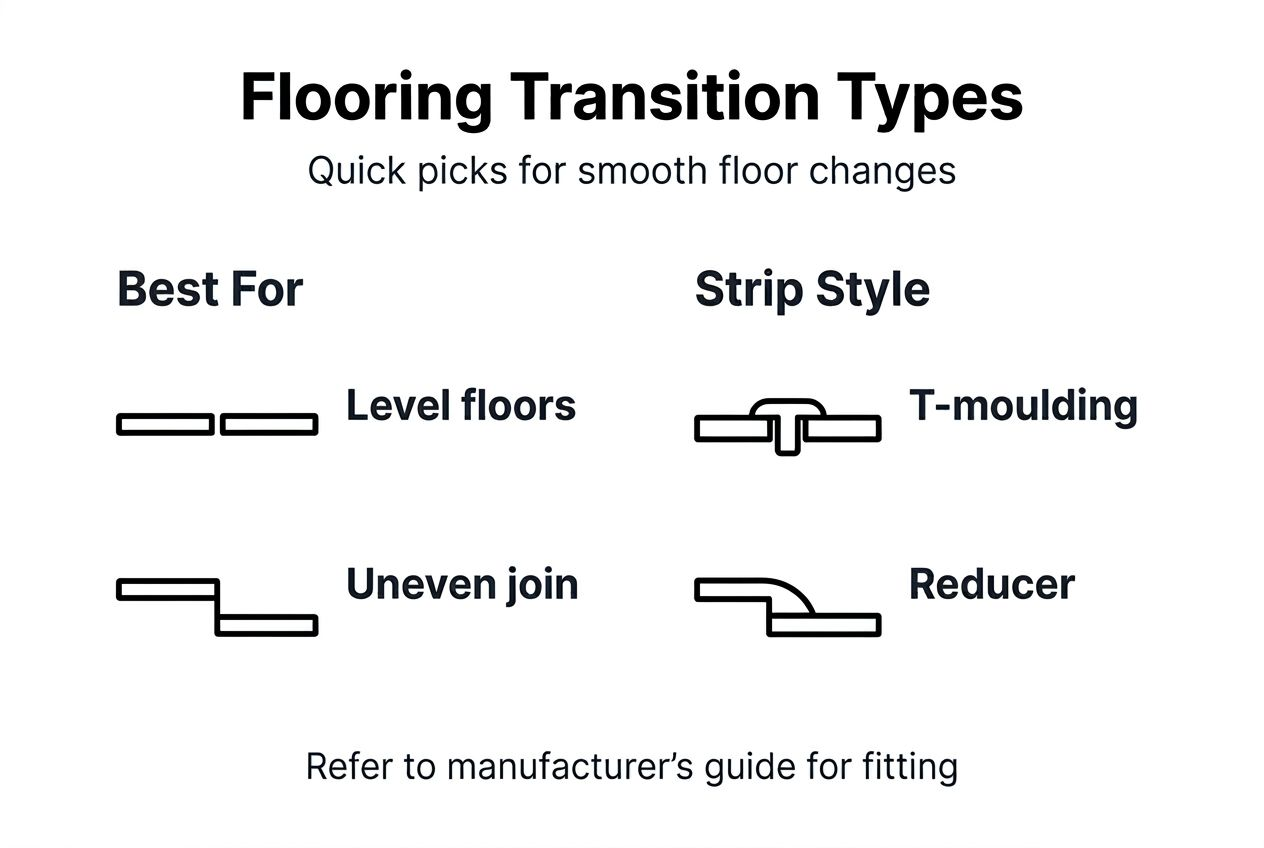
Selecting the right transition strip for your floors
Choosing the correct transition strip depends on three factors: the height difference between floors, the materials being joined, and your aesthetic preferences. Understanding these variables ensures a seamless, durable result.
T-moulding is the most versatile option. T-moulding works best for floors within 1/4" height difference, creating a symmetrical bridge between two surfaces at similar levels. It’s ideal for connecting rooms with the same flooring type running in different directions or joining laminate to hardfloor surfaces.
Reducer strips solve height mismatches. Reducer strips create a gradual slope from higher to lower floors, accommodating differences from 1/4" to 3/4". These work brilliantly when transitioning from thick hardwood to thinner vinyl or from raised laminate to existing carpet.

Threshold strips mark boundaries and contain flooring within rooms. They’re typically installed in doorways or at the edge of tiled areas, creating a finished edge that prevents flooring from shifting. Thresholds can be flat for minimal height differences or ramped for accessibility.
| Transition type | Best for height difference | Common applications | Typical width |
|---|---|---|---|
| T-moulding | 0" to 1/4" | Same level floors, direction changes | 38mm to 50mm |
| Reducer strip | 1/4" to 3/4" | Wood to vinyl, laminate to carpet | 38mm to 75mm |
| Threshold | Varies | Doorways, room boundaries, tile edges | 30mm to 90mm |
| Ramp profile | 1/2" to 1" | Accessibility, carpet to hardfloor | 50mm to 100mm |
Design considerations matter as much as function. Metal transition strips with custom finishes enhance modern interiors, offering styles from brushed chrome to antique brass. Solid metal strips provide superior durability compared to plastic alternatives, maintaining their appearance for decades.
Colour matching creates visual flow. Choose finishes that complement your flooring tones: warm brass for oak or walnut, satin nickel for grey laminate, or polished chrome for contemporary spaces. Contrast can also work intentionally, using darker strips to define room boundaries or highlight architectural features.
Pro tip: Always measure the exact height difference at multiple points along the transition line before purchasing. Subfloors can be uneven, and what appears level may vary by several millimetres across a doorway. Purchase strips designed for the maximum difference you measure. For challenging installations with significant unevenness, explore transition strips for uneven floors that offer adjustability.
Step by step installation of flooring transitions
Proper installation ensures transitions remain secure and attractive for years. Follow these detailed steps for professional results across different transition types.
Preparation phase:
- Clean the subfloor thoroughly, removing dust, debris, and old adhesive
- Check subfloor level with a spirit level, noting any dips or high spots
- Cut flooring materials to leave the required expansion gap (typically 10mm to 15mm)
- Test fit the transition strip before final installation
Installing T-moulding:
- Measure the doorway width precisely and cut the strip 2mm shorter to allow for wall expansion
- If using a track system, secure the track to the subfloor with screws every 200mm
- Snap the T-moulding profile into the track, ensuring it sits evenly
- For adhesive installation, apply construction adhesive along the subfloor centre line
- Press the strip firmly and wipe away excess adhesive immediately
- Place weights along the strip and allow 24 hours for full cure
Installing reducer strips:
- Position the strip so the higher edge aligns with the taller floor surface
- Reducers should be secured with adhesives or screws for stability
- Drill pilot holes if using screws, spacing them 250mm apart
- Countersink screws slightly below the surface
- Check the slope is gradual and doesn’t create a trip hazard
- Fill screw holes with colour matched wood filler if desired
Installing threshold strips:
- Mark the doorway centre line on the subfloor
- Apply adhesive or position pre-drilled screw holes
- Press the threshold firmly, checking it’s level across its width
- Secure with screws if needed, ensuring the strip sits flush with both floor surfaces
When transitioning from laminate to carpet, take extra care. Cut the laminate to allow proper expansion, then use a laminate threshold strip that covers the gap whilst the carpet tucks underneath. This method prevents the carpet edge from fraying and keeps the transition clean.
Using tapping blocks and pull bars protects laminate locking systems during installation, preventing damage to the tongue and groove mechanism near transition areas. These tools distribute force evenly, ensuring tight seams without cracking.
| Installation step | T-moulding | Reducer strip | Threshold |
|---|---|---|---|
| Expansion gap required | 10mm to 15mm | 10mm to 15mm | 5mm to 10mm |
| Fixing method | Track or adhesive | Screws or adhesive | Screws or adhesive |
| Typical installation time | 20 to 30 minutes | 25 to 35 minutes | 15 to 25 minutes |
| Tools needed | Saw, drill, level | Saw, drill, screwdriver | Drill, screwdriver, level |
Pro tip: For invisible transitions, consider flush mount systems where flooring meets at the same height with a minimal gap. Fill this gap with flexible, colour matched silicone for a seamless look. This works beautifully in open plan spaces where you want material changes to feel subtle rather than defined.
Common mistakes, troubleshooting, and finishing touches
Avoiding frequent installation errors saves time, money, and frustration. Understanding what can go wrong helps you anticipate problems before they occur.
Common installation mistakes:
- Ignoring expansion gaps leads to buckling. Skipping acclimation leads to gapping, buckling or warping because the flooring hasn’t adjusted to room conditions.
- Using incorrect fixing methods. Adhesive alone may fail in high traffic areas, whilst screws through thin strips can crack metal.
- Cutting strips too long. Strips jammed tightly between walls create pressure points that prevent flooring movement.
- Misaligning profiles. Strips installed at angles or not centred over gaps look unprofessional and may create trip hazards.
- Over-tightening screws. This distorts metal strips and can crack the subfloor beneath.
When troubleshooting misaligned transitions, loosen fixings and reposition the strip using spacers to maintain consistent gaps. For loose strips, add additional adhesive or install supplementary screws at points where movement occurs. If a strip rocks or pivots, the subfloor beneath may be uneven; pack with thin shims before securing.
Transition strips prevent trip hazards by evening floor height differences and eliminating exposed edges that can catch feet, particularly important in homes with elderly residents or young children.
Safety extends beyond preventing trips. Properly installed transitions also stop moisture migration between rooms, contain spills in wet areas, and prevent dust accumulation in gaps. For homes prioritising accessibility, consider how to reduce trip hazards systematically throughout living spaces.
Finishing touches for durability and aesthetics:
- Apply clear silicone along edges where transitions meet walls, creating a moisture barrier
- Use colour matched silicone or caulk to fill small gaps between strips and flooring
- Clean metal strips with appropriate products; avoid abrasive cleaners that damage finishes
- Check all fixings quarterly, particularly in high traffic areas, tightening any that have loosened
- Consider applying furniture felt pads to the underside of door bottoms to prevent scratching metal strips
For persistent issues with laminate transitions, review comprehensive troubleshooting guidance that addresses specific material challenges. Sometimes the solution involves adjusting surrounding flooring rather than the transition itself.
Pro tip: Photograph your transitions immediately after installation from multiple angles. These images serve as a reference for future repairs or remodelling projects, showing exactly how strips were positioned and fixed. They’re also invaluable if you need to match finishes later.
Explore quality flooring trims for your project
Achieving the polished, professional finish described in this guide requires quality materials designed for longevity. Quality Carpet Trims offers an extensive range of solid metal door bars and thresholds, hand finished in ten beautiful finishes to perfectly complement your flooring choices.

Whether you need a matwell trim for entrance areas, versatile threshold strips for doorways, or specialised profiles for complex transitions, the comprehensive selection ensures you’ll find the right solution. Each product is manufactured in the UK to exacting standards, with options for free samples so you can verify finish and quality before committing.
Explore detailed guides on flooring trim types to understand which profiles suit your specific project. With fast delivery, expert fitting advice, and a commitment to quality that sets them apart from inferior plastic or standard aluminium alternatives, Quality Carpet Trims helps DIY enthusiasts and professionals alike achieve results that last.
Frequently asked questions about flooring transitions
What gap size is needed for wood floor expansion?
Maintain a 10mm to 15mm expansion gap where wood or laminate flooring meets walls, doorways, or fixed objects. This space allows natural seasonal movement without causing buckling or damage.
Can I install transition strips myself or should I hire a professional?
Most homeowners can successfully install transition strips using basic DIY skills and common tools. Follow manufacturer instructions carefully, ensure proper measurements, and take your time for professional results.
Which transition strip suits laminate to carpet best?
A threshold strip or reducer works well for laminate to carpet transitions. Choose based on height difference: use thresholds for level surfaces, reducers when laminate sits higher than carpet backing.
How do I prevent trip hazards at floor junctions?
Select transition strips that create gradual slopes rather than abrupt edges, ensure strips sit flush with surrounding floors, and secure them firmly to prevent movement. Regular maintenance checks keep strips safe over time.
What is the flush transition method and when should I use it?
Flush transitions involve precise cutting so both floor surfaces meet at exactly the same height with a minimal gap, often filled with colour matched silicone. Use this method in open plan spaces where you want material changes to appear seamless rather than defined by visible strips.
How often should I replace flooring transition strips?
Quality metal transitions can last 20 years or more with proper care. Inspect annually for loosening, damage, or finish deterioration. Replace strips showing significant wear, sharp edges, or if you’re updating flooring materials.
Recommended
- Flooring Transition Guide for Perfect Metal Trim Fitting
- Installing Flooring Edge Trims for Seamless Floor Transitions
- How to Choose Flooring Transitions: Cut Trip Hazards 30%
- Transition Strips For Uneven Floors In All Shapes And Sizes.